Keyframe Animation Overview
Bring your SketchUp model to life by adding movement to any object.
Keyframe Animation makes animating objects in SketchUp easy and intutive. Ordinary scenes act as keyframes. For each scene, just place the objects where you want them to be, and click the Record button. When a scene is selected, the objects will magically translate, rotate, and scale to their recorded values.
Animated Construction Example By Mark Clapsadle
This video demonstrates a complex construction process, where the parts are moved into place using the Keyframe Animation plugin.
Toolbar
The main features of Keyframe Animation are conveniently located on the toolbar to facilitate your workflow.

 |
Animate Objects | Toggle the Object Animation on and off (i.e. enable or disable it). |
 |
Record Objects | Save the position data of all selected objects on the current scene. |
 |
Select Objects | New Select all objects with position data recorded on the current scene. |
 |
Erase Objects | Delete the position data of all selected objects on every scene. |
 |
Scene Time Settings... | Open a window to set specific scene transition and delay times for individual scenes. |
 |
Export Video... | New Export the animation to a video with a standard resolution and frame rate. |
 |
Help Button | Opens the Keyframe Animation 2.2 User Guide in your browser. |
Object Interpolation
Keyframe Animation figures out the best way to interpolate objects between keyframes.
The way Keyframe Animation animates objects depends on how their location, orientation, and size changes. Objects can be interpolated by translation, rotation, scale, reflection, inversion, or a combination.
 |
Translation | If the move tool is used to change the location, then the object is interpolated by translation along a straight line. |
 |
Rotation | If the rotation tool is used to change the location and orientation, then the object is interpolated by rotation about the appropriate axis, through the smaller angle (i.e. the one less than or equal to 180 degrees). |
 |
Scale | If the scale tool is used to change the size, then the object is interpolated by scaling it along each component axis. |
| New | Reflection |
If an object is flipped along one of its axes (context menu right-click > Flip Along), that reflects it.
This is interpolated by moving every point along a line that passes through a "mirror plane" in the middle,
to a point an equal distance on the other side, reflecting the object in the process.
|
| New | Inversion | If an object is flipped along all three component axes (i.e. red, green, and blue), that inverts it. This is interpolated by moving every point along a line that passes through the center to a point an equal distance on the other side (i.e. its antipodal point). This inverts the object in the process. |
Object Interpolation Tutorial
This tutorial illustrates the five types of interpolation supported in Keyframe Animation 2.x: Translation, Rotation, Scale, Reflection, and Inversion.
Animating Nested Objects
Objects contained inside of other objects can also be animated at any depth.
An object can be either a group or a component. If an object is contained inside of another object, then it moves relative to its parent. If the parent also moves, the combination of translations and rotations can result in more complex types of motion.
Folding Doors By Regular Polygon
The middle door is a subgroup of the door on the right, and the door on the left is a subgroup of the middle door. When the right door rotates 90 degrees clockwise, the middle door rotates 90 degrees counter-clockwise relative to it. The combination of both rotations produce the natural motion of folding doors.
Scene Time Settings
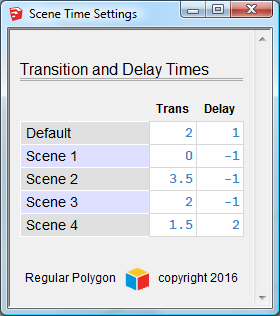
Use the Scene Time Settings window  to update transition time and delay times for any scene.
The transition time is the number of seconds it will take for the animated objects to move to their recorded positions. SketchUp scene properties -- like camera location, or shadow settings -- use the same transition time.
The delay time is the number of seconds the animation will wait before beginning the transition to the next scene. Use this to pause the object animation between scenes. The SketchUp scene animation will pause also.
The setting is saved when the text field looses focus. A bell will ring to indicate the property has changed. The time is rounded to half-second intervals.
Animating Scene Properties
Combine the Keyframe object animation with the SketchUp scene property animation.
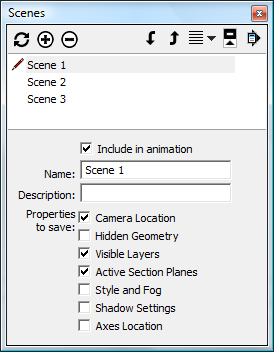
Use the SketchUp Scenes Manager (Window > Scenes)
to manage the properties that each scene saves.
Keyframe Animation 2.x plays nice with all the SketchUp scene properties:
- Camera Location
- Hidden Geometry
- Visible Layers
- Section Planes
- Style and Fog
- Shadow Settings
Exporting the Animation
Once your animation is set up, you can export it to a standard video, custom video, or an image sequence.
SketchUp has a utility to export animations, but it only exports its own built-in animation of the scene properties, and ignores the object animation. However, Keyframe Animation 2.0 has a utility to export both the scene animation and the object animation.
New in version 2.0 and 2.2: Video Export Utility.
Now you can combine SketchUp's built-in scene animation with Keyframe's object animation, and export it all, directly from the keyframe model. You no longer have to create the tweens model to export the object animation. This new approach is fast, simple, and far more efficient than creating the resource intensive tweens.
Exporting a Standard Video (PC only)
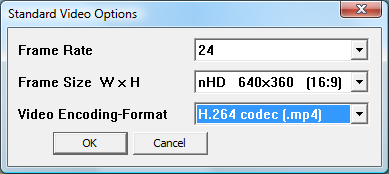
Click the Export Video Button  on the toolbar to export the animation as a video with standard settings.
(Currently this only supported on the PC, not the Mac.)
There are several video codecs and formats that are new in version 2.0.
- H.264 codec (
.mp4) - VP8 codec (
.webm) - VP9 codec (
.webm) New - Theora codec (
.ogg) - Animated GIF (
.gif) New - Windows Media Video (
.wmv) New - Microsoft MPEG-4 v2 (
.avi) New - Lossless (
.avi) New - Uncompressed (
.avi)
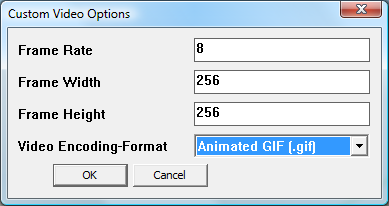
New Exporting a Custom Video (PC only)
To export the animation as a video with custom settings, access the menu item Export Animation > Custom Video.... (Currently this only supported on the PC, not the Mac.)
The Frame Rate can go from 1 to 60 frames per second.
The Frame Size can go from 8x8 to 3840x2160 pixels.
The Video Encoding-Format options are the same as the Standard Video export.
Exporting an Image Sequence (PC and Mac)
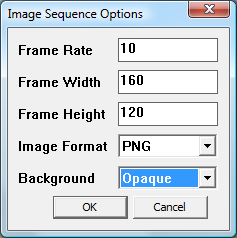
To export the animation a sequence of image files, access the menu item Export Animation > Image Sequence....
The Frame Rate can go from 1 to 60 frames per second.
The Frame Size can go from 8x8 to 3840x2160 pixels.
The Image Format has a drop-down list to choose from JPG, PNG, TIF, or BMP.
The Background is always opaque for .jpg, .tif, and .bmp images.
However, if exporting .png images, the background can be either opaque or transparent.
New Progress Bar (PC and Mac)
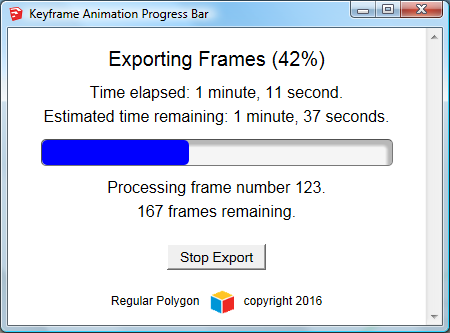
The export process is much more user friendly with the new Progress Bar. It displays the time elapsed and the estimated time remaining. It also keeps SketchUp responsive. You can stop the export at any time, and resume it, or quit and pick up where you left off another day.
In conclusion, you can combine the Keyframe object animation with any SketchUp scene property, and export it all to a movie. I think that Keyframe Animation 2 is the only plugin out there that can combine object animation with section cuts. The following video demonstrates this.
24 Pencil Sculpture By Regular Polygon
Section cuts reveal how 24 pencils, with hexagonal cross-sections, criss-cross from four directions, and interlock with each other.
Make Tweens and Export a Movie
The tweens are SketchUp scenes with the object animation "baked in".

The tweens were in version 1.9. We omitted them in version 2.0. But we brought back the tweens in version 2.1+. This is good for at least two reasons. First, you can create a video on both platforms using the native SketchUp Export Animation utility. So, the Mac can now export a video again -- it couldn't in version 2.0.
Second, the tweens are very amenable to rendering applications. They are essentially SketchUp scenes, but with the Keyframe object animation "baked in", so to speak. Basically, when SketchUp animates the Visible Layers scene property, the objects move. Therefore, any application that can render the SketchUp scene tabs should also -- via the tweens -- be able to render the Keyframe object animation. Here are some compatible rendering applications:
- V-Ray
- Enscape
- Twilight
- Shaderlight
Brighter3D can render the object animation directly from the Keyframe model.
Improved Tween Production
The algorithm that creates the tweens in version 2.1 is faster, more efficient, and uses less memory. You should see the improvement over version 1.9. New
Tweens Support All Scene Properties.
In version 2.1, the tweens play nice with ALL the SketchUp scene properties.
- Camera Location
- Hidden Geometry New
- Visible Layers
- Section Planes New
- Style and Fog New
- Shadow Settings New
Backward Compatibility with Version 1.9
Convert animations in version 1.9 format to version 2.x format, quick and easy.
If you see a grayed out toolbar, like this...

...it is NOT a bug.
That just means your model has position data recorded in version 1.9 format. What is going on under the hood in version 2 is so different that a version 1.9 animation will not run. If you open a model with version 1.9 position data, then all of the commands on the toolbar -- except the Help button -- will be disabled.
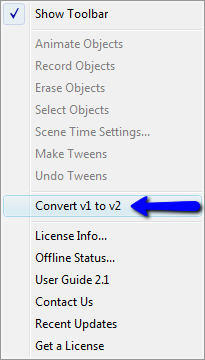
However, there is an easy solution. Version 2.1 has a utility that will convert any Keyframe Animation from version 1.9 format to version 2.x format. Access is from the menu item, Keyframe Animation > Convert v1 to v2.
The version 2.x compatible animation is created in a new model. You can save it with any name you want. The original model is NOT modified.
Once the new model is open, your old animation will work in Keyframe Animation 2, and all the toolbar buttons and menu items will be enabled normally.
The conversion utility now works in any version of SketchUp, from SketchUp 6 to SketchUp 2019.
