User Guide Keyframe Animation 2.1
New ! Keyframe Animation 2.2 New !
We integrated the video export feature from version 2.0.
Export the object animation to a video, directly from the keyframe model.
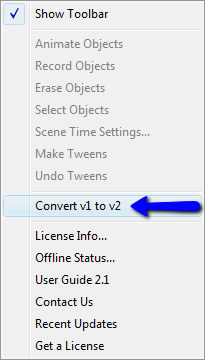
Toolbar and Menu
The main features of Keyframe Animation 2.1 are conveniently located on the toolbar to facilitate your workflow.
The main menu is at, Plugins > Keyframe Animation.
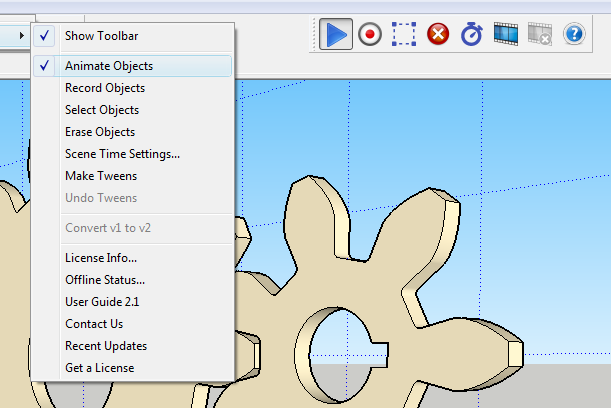
| Show Toolbar | Toggle the toolbar visibility. | |
 |
Animate Objects | Toggle the Object Animation on and off. |
 |
Record Objects | Save the position data of selected objects on the current scene. (Disabled if no scenes.) |
 |
Select Objects | New Select the objects which are recorded on the current scene. (Disabled if no scenes.) |
 |
Erase Objects | Delete position data of selected objects on all scenes. (Disabled if no objects are selected.) |
 |
Scene Time Settings... | Open a window to set specific scene transition and delay times for individual scenes. |
 |
Make Tweens | New Generate in between scenes with the object animation "baked in". |
 |
Undo Tweens | Restore the original keyframe model. (Enabled only in the tweens model.) |
| Convert v1 to v2 | New Run a utility that will convert a version 1.9 animation to version 2.x format. | |
| License Info... | Display User Info, Trial Info, and License Info. Activate a free trial. Register a license. | |
| Offline Status... | See if you are online or offline, and how much time you have left to use SketchUp offline. | |
 |
User Guide 2.1 | Open up the User Guide 2.1 in your browser. |
| Contact Us | Open the Regular Polygon Contact Us page in your browser. | |
| Recent Updates | Open the Keyframe Animation Download page in your browser. | |
| Get a license | Open the Keyframe Animation Purchase page in your browser. |
Creating an Animation
There are seven easy steps to set up an animation and get your objects moving.
Step 1 - Group Geometry
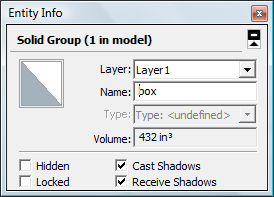
Convert any geometry that you want to animate into groups or components. Loose geometry can not be animated.
To check the type of something, select it, right-click, and choose Entity Info (context menu right-click > Entity Info)
It doesn't make any difference, for animation purposes, whether something is a group or a component. So, we will refer to them generically as objects.
Step 2 - Add Scenes
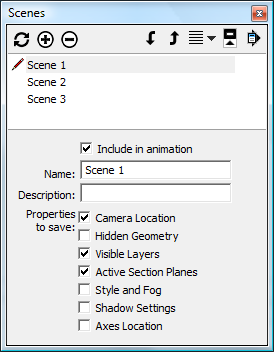
Add some scenes. You can use the Scenes Manager for this (menu item Window > Scenes).
Each scene is essentially a keyframe. You can add more scenes later, delete scenes, or change their order. To run an animation in reverse, just reverse the order of the scenes.
SketchUp will animate the properties saved with a scene. Keyframe Animation will animate the objects that are recorded on a scene.
New Keyframe Animation 2.x is compatible with all the scene properties:
- Camera Location
- Hidden Geometry New
- Visible Layers
- Section Planes New
- Style and Fog New
- Shadow Settings New
You can combine SketchUp's built-in animation of any scene property, with Keyframe's object animation, and export it all to a video.
New Support for all camera features.
In version 2.1, the Tweens now support all the camera features, so any type of camera animation can be exported to a video, together with Keyframe's object animation. This includes the Orthographic (Parallel Projection) camera. And changes to the Perspective camera Field Of View.
Tip: Camera Location
If you are creating an animation where the camera does not move, leave the Camera Location box on each scene unchecked. This way, if you want to change the perspective you view the animation from, you can change it on-the-fly, for all the scenes at once, without having to update the Camera Location property on each scene.
Step 3 - Select a Scene
Select the first scene by clicking on the scene tab. The tab becomes highlighted.
The scene with a highlighted tab is referred to as the current scene.
You can change which scene is the current one by clicking on different tabs, or by double-clicking on the scene name in the Scenes Manager.
Step 4 - Position Objects
Now use the Move Tool  ,
the Rotation Tool
,
the Rotation Tool  ,
or the Scale Tool
,
or the Scale Tool  ,
to position and/or resize the objects on the current scene.
,
to position and/or resize the objects on the current scene.
Step 5 - Record Objects
Click the Record Button on the toolbar to save the position data of objects on the current scene.
It doesn't make any difference whether the Play button is toggled on or off. A bell will ring, and the objects that were recorded will remain selected afterward, so you can see which ones they are. A plop sound indicates that no objects were recorded.
New The record feature works slightly different in version 2.x. We think this logic is more intuitive and functional.
- If any objects are selected when you click the Record button, then only those objects will be recorded. This approach gives you the most control.
- If nothing is selected when you click Record, then all moving objects (i.e. objects that have position data saved for any scene) will be recorded. This approach saves time.
Re-recording an object updates its position data. To revise an animation, simply move the objects to new positions and re-record.
New in version 2.x: The Select Button.
There is a new Select Button on the toolbar.
It selects all objects that have position data saved on the current scene.
Then, with the objects selected, you can record them all in one click.
It is also a quick way to check if an object has position data saved on the current scene or not.
Tip: Objects must be groups or components.
Loose geometry can not be recorded or animated.
Use the Entity Info window to check the type (context menu right-click > Entity Info).
The Erase Button is kind of the opposite of Record.
It deletes the position data of all selected objects on every scene.
It is useful if you want to take a moving object out of the animation and make it stationary.
Warning: copying objects.
If you copy an object (e.g. Move + Ctrl),
that will copy the object's position data too.
So, you will probably want to click the Erase Button to delete it.
Otherwise, the copied object will move to the same location as the original object during the animation.
Warning: changing scene names.
The position data is tied to the scene names. So, if you change a scene's name, then the object's position data associated with it is lost. You will need to re-record the objects on that scene.
Step 6 - Repeat for each Scene
That is the basic workflow. Just repeat steps 3, 4, and 5 for each scene.
Step 7 - Play the Animation
The Play Button on the toolbar toggles Object Animation on or off.
When toggled on, objects will automatically move to their recorded positions during each scene transition.
When the Play button is toggled off, the objects won't move. Object animation is turned off by default when SketchUp first opens.
You can test out the animation by selecting the scenes, one at a time, to initiate each scene transition. Or run a slideshow of the entire animation (View > Animation > Play).
Tip: What to do if objects don't move.
If your objects are not moving, here are some steps to diagnose the cause.
- Check if the Play Button is toggled off. It is turned off by default when SketchUp opens.
-
An object will not move if there is no position data saved on the scene for it.
Click the Select Button to see if the object has positon data saved on the current scene.
- If the object still doesn't move, maybe the position saved is the same as where it's at already. Try moving it somewhere else, and then select the scene tab. It should move back.
If an object is open for editing, the Object Animation will still proceed, but it is restricted to the moving objects that are contained in the active context.
Types of Interpolation
There are three types of interpolation depending on whether you Move ,
Rotate ,
or Scale the objects.
Things can get more complicated if you combine the operations.
If you Move the object between scenes,
then it is interpolated as a translation.
If you Rotate the object between scenes,
then the plugin figures out the correct point of rotation and axis of rotation for the interpolation.
Note that rotations are always interpolated through the smallest angle between the two orientations.
So, the angle will always be less than or equal to 180 degrees.
If the angle is exactly 180 degrees, the direction is ambiguous, so the object could rotate either way.
If you scale the object between scenes,
then the object's size is interpolated.
The scale factor can be positive or negative for each component axis (red, green, or blue).
A negative scale factor amounts to a reflection along that axis.
New in version 2.x: Fixed the negative scale factor bug.
In version 1.9, there was a bug that occurred if an object was scaled past zero, which resulted in a negative scale factor. Now a negative scale factor is interpolated as a reflection.
A rotation
and a translation can not be combined, in general.
However, if the translation is parallel to the axis of rotation, then Keyframe Animation will interpolate it correctly.
For the other situations, it is possible to combine a translation with a rotation by
animating nested objects.
You can translate
and scale an object at the same time.
Keyframe Animation will always interpolate this correctly.
A scale
and a rotation can usually be combined.
If the point scaled about lies on the axis of rotation, then Keyframe Animation will interpolate it correctly.
If they are different, the interpolation will use a fixed point in between to both rotate and scale about.
If you want to scale about one point, while rotating about a different point,
you can do that by animating nested objects.
New in version 2.x: Reflections.
If you flip an object along its red, green, or blue axis (e.g. context menu right-click > Flip Along), that reflects it. Keyframe Animation 2 interpolates a Reflection by moving every point along a line that passes through a "mirror plane" in the middle to a point an equal distance on the other side -- reflecting the object in the process.
New in version 2.x: Inversions.
If you flip an object along all three axes, that inverts it. It amounts to a reflection through the center point. Keyframe Animation 2 interpolates an Inversion by moving every point along a line that passes through the center to a point an equal distance on the other side -- inverting the object in the process.
Tip: Reflections and Rotations.
If you flip an object along two axes, that is actually the same operation as rotating it 180 degrees, so it is interpolated as an ordinary rotation.
Animating Nested Objects
Keyframe Animation allows you to animate subgroups (or subcomponents) to any depth. Subgroups (subcomponents) move relative to their parent. They inherit their parent's motion, and then apply their own movement relative to it. This allows you to compose translations, rotations, and scaling operations, in order to create more complex types of motion.
To record a subgroup (subcomponent), select it first, then click the Record button. Usually, the easiest way to select a nested object is with Outliner. The other way is to open the objects that contain it by successively double-clicking on them, until you can select the nested object.
Time Settings
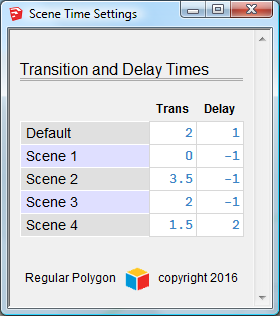
Click the Time Settings Button on the toolbar to display the Scene Time Settings window.
This interface allows you to set the transition time and delay time for each scene.
The time is rounded to half-second intervals.
The transition time is the number of seconds it takes for the animated objects to move to their recorded positions. It is also the time it takes for scene properties -- like camera location, or shadow settings -- to transition to the value saved with the scene. A negative value will use the default transition time.
The delay time is the number of seconds the animation will wait before beginning the transition to the next scene. A negative value will use the default delay time.
All settings are saved as soon as the text box loses focus. A bell will ring to indicate the value has changed.
Make Tweens and export the animation to a movie
Once your animation is set up, you may want to export it to a movie, or to a sequence of images. SketchUp has a built-in utility to export animations, but it only exports the SketchUp scene property animation, and ignores the Keyframe object animation. However, Keyframe Animation has a workaround that solves this. It creates many scenes in between the keyframes, with copies of the moving objects interpolated between their keyframe positions.
The in between scenes are called tweens for short. They can be generated for any frame rate up to 60 frames per second. These tweens have the object animation "baked in", so it can be exported directly from SketchUp, along with the scene property animation.
New Improved Tween Production
The algorithm that creates the tweens in version 2.1 is faster, more efficient, and uses less memory. The tweens are not so resource intensive now. You will see the improvement over version 1.9.
New Tweens Support All Scene Properties.
In version 2.1, the tweens play nice with ALL the SketchUp scene properties.
- Camera Location
- Hidden Geometry New
- Visible Layers
- Section Planes New
- Style and Fog New
- Shadow Settings New
Now you can combine Keyframe's object animation with ANY of the animated scene properties, and export it all to a movie.
To generate the tweens, click the Make Tweens button on the toolbar.
Tip: Close all window managers first.
Before you generate the tweens, close all dialogs like Outliner, Model Info, the Scenes Manager, the Layers Manager, etc. If they are open, it can greatly slowdown SketchUp, since then it tries to update the dialogs while it creates the tweens.
You will be asked to set a frame rate. The frame rate specifies how many tweens will be created for each second of transition time. The frame rate can be from 1 to 60 frames per second. A higher frame rate makes the interpolation smoother, but more tweens will be created.
Tip: Video Frame Rate = Tween Frame Rate.
The video you export should have the same frame rate as was used to create the tweens. For example, if you want to export a video at 24 frames per second, then you should create the tweens at 24 fps also. Otherwise, there could be subtle sync issues with the moving objects jumping ahead or lagging behind on various frames.
Before the tweens are generated, a message pop-up reports an upper limit for the number of tweens that will be created. If the number is greater than 1500 tweens, you may want to cancel the operation. The greater the number, the more it will slowdown SketchUp, and possibly crash it if you run out of memory.
Tip: Export the Animation in Parts.
Larger animations should be broken up and exported in parts. The Scenes Manager has a checkbox to include or remove a scene from the animation. If the scene in the keyframe model has been removed from the animation, then no tweens will be generated for it.
The tweens will be created in a new model. The original Keyframe model is NOT modified. A Save As dialog will prompt you for a name and location to save the Tweens model. The default name is the Keyframe model name with ".tweens" appended to it.

Since there are usually hundreds of tweens, it might take a few minutes to generate all of them. In the tween tab, the first number indicates which keyframe the tween is associated with. The second number is the index in the sequence of tweens that make up the keyframe transition. If no objects move on a keyframe, then a transition (sequence) of tweens is unnecessary. In that case, Keyframe N is replaced by single scene called Tween N. The first keyframe never has a transition, so it is always called Tween 1.
Click the Undo Tweens button
on the toolbar to return to the original Keyframe model and make some adjustments.
It doesn't really undo the tweens; they are in a separate model, which you can save before you leave.
This just restores the original Keyframe model, so you can resume working where you left off.
Note that all the toolbar buttons are disabled in the Tweens model
except the Undo Tweens button ,
and the Help button .
Now run the SketchUp export utility to turn your tweens into movie (or an image sequence). Each tween will become one frame in the movie. The menu item is, File > Export > Animation > Video.... This brings up the Export Animation dialog box. The options available depend on your version of SketchUp and whether it is Make or Pro.
This SketchUp Help article has more information about exporting video animations.
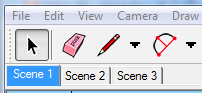
Backward Compatibility with Version 1.9
If you see a grayed out toolbar, like this...

it is NOT a bug.
A grayed out toolbar means your model has position data recorded in version 1.9 format. What is going on under the hood in version 2.x is so different that a version 1.x animation will not run. If you open a model with version 1.x position data, then all of the commands on the toolbar and menu will be disabled.
However, there is an easy solution.
Version 2.1 has a utility that will convert any Keyframe Animation from version 1.9 format to version 2.x format.
Access is from the menu item, Keyframe Animation > Convert v1 to v2.
The Keyframe 2.x compatible animation is created in a new model. You can save it with any name you want. The original model is NOT modified.
Once the new model is open, your old animation will work in Keyframe Animation 2.x, and all the toolbar buttons and menu items will be enabled normally.
The conversion utility now works in any version of SketchUp, from SketchUp 6 to SketchUp 2019.
License Management
Since version 2.1.2, Keyframe Animation uses a new and improved license management system. It has several new features to make everything about the license process simple and easy to manage.
- The new system supports SketchUp 8+. New
- Frequent activation issues that affected versions 1.9 and 2.0 have been fixed. New
- It is no longer necessary to remove the license from the old computer when you transfer it. New
- There is a new utility to view the Internet connection status, and time available for off-line use. New
- The new License Info dialog has a modern, user-friendly interface to view and manage your trial and license status. New
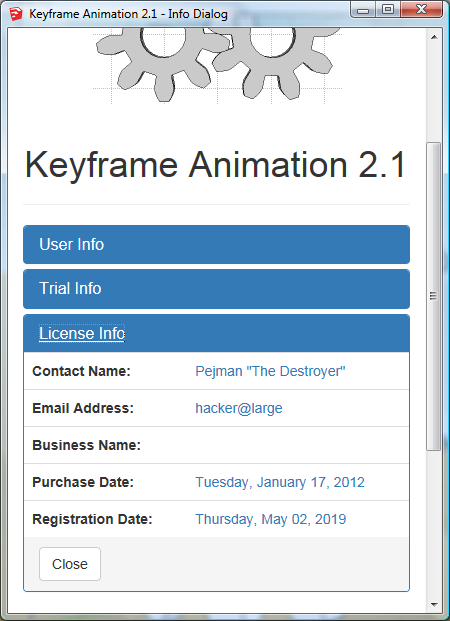
The new License Info dialog is accessed via the menu item, Keyframe Animation > License Info.... It organizes the information into three collapsible panels: User Info, Trial Info, and License Info.
Activation
Activation makes the software fully functional. You can activate the software by starting a free trial (via the Trial Info panel). Or by registering a license (via the License Info panel).
We think the new system has fixed a lot of activation issues that plagued versions 1.9 and 2.0. For one thing, SketchUp 8 previously was not supported. But now, Keyframe Animation 2.1 can be activated on SketchUp 8. Since SketchUp 2017, activation was frequently denied due to technical issues. However, this new system takes a different approach, which should side-step those technical issues. If anyone has any difficulty activating the software, please let us know.
License Registration
The License Registration associates a license with a user. Open the License Info panel, enter the license key (serial number) in the text-field, and click the Register button. If all goes well, the license is registered to that user.
The license registration is per user (not per computer). If there are multiple users on the same computer, only one of them can use the license at a time. But since only one user can use the computer at a time, that should not be a big problem. If you have a Mac that is set up to emulate Windows, those are two different platforms, with two different users, so the license can be registered on only one of them at a time.
The registration covers all versions of SketchUp that the user has installed. After the license has been registered on one version of SketchUp, the system will find the license on all the other versions. Even if you enter an invalid serial number, if will still find the license that was previously registered by the user.
License Transfer
You will notice that in the License Info panel there is no Remove button. One of the best features of this new system is that you don't have to remove the license first before you transfer it to a new user. Just open the License Info dialog on the new computer, and enter your serial number, and register the new user. The old user is automatically deregistered.
There are a couple conditions that may block the license transfer. One, the license can not be registered any more often than once every two hours. Two, the license can not be registered to more than two different users in one week.
So, if you always transfer the license between the same two computers -- like a desktop and a laptop -- you can transfer it as often as every two hours, as many times as you want. However, if you are transferring the license to a third computer, then you will have to wait a week from the time you registered the license on the first computer.
Offline Use
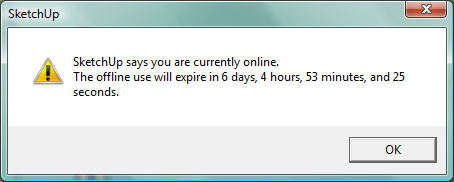
If you have a license, you can use the plugin offline for up to one week from the last time you used the plugin with an internet connection. If you have an active trial, but no license, then you can't use the plugin offline.
There is a new utility that reports your Offline Status. It is accessed via the menu item, Keyframe Animation > Offline Status.... It will report if SketchUp thinks you are online or offline, and how much time is left to use the plugin offline.