User Guide Keyframe Animation 2.0
New ! Keyframe Animation 2.2 New !
Free Upgrade! Get lots of new features.
Toolbar and Menu
The main features of Keyframe Animation 2.0 are conveniently located on the toolbar to facilitate your workflow.

 |
Play Button | Toggles the Object Animation on and off. |
 |
Record Button | Saves the position data of objects on the current scene. (Disabled if there are no scenes.) |
 |
Erase Button | Deletes the position data of all selected objects on every scene. (Disabled if no objects are selected.) |
 |
Select Button | Selects all the objects that have position data saved on the current scene. (Disabled if there are no scenes.) |
 |
Time Settings Button | Toggles the display of the Scene Time Settings window. The Scene Time Settings window lets you set the transition time and delay time for each scene. |
 |
Export Video Button | Exports the animation to a video directly from the keyframe model. (Disabled unless there are at least two scenes.) |
 |
Help Button | Opens up the User Guide (the page you are viewing now) in your browser. |
The main menu is at Plugins/Extensions > Keyframe Animation.
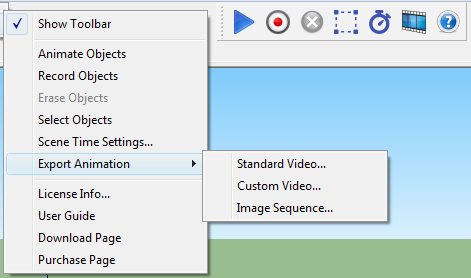
| Show Toolbar | Toggles the toolbar visibility. | |
|
Animate Objects | Does the same thing as clicking the Play Button on the toolbar. |
|
Record Objects | Does the same thing as clicking the Record Button on the toolbar. |
|
Erase Objects | Does the same thing as clicking the Erase Button on the toolbar. (Disabled if no objects are selected.) |
|
Select Objects | Does the same thing as clicking the Select Button on the toolbar. (Disabled if there are no scenes.) |
|
Scene Time Settings... | Does the same thing as clicking the Time Settings Button on the toolbar. |
|
Export > Standard Video... | Exports the animation to a video with a standard frame size and frame rate. Same as clicking the Export Video Button on the toolbar. (Disabled if less than two scenes.) |
| Export > Custom Video... | Exports the animation to a video with a custom frame size up to 3840 x 2160 pixels, and frame rate up to 60 fps. (Disabled if less than two scenes.) | |
| Export > Image Sequence... | Exports the individual frames of the animation as a sequence of images. Has the same range of settings as Custom Video. (Disabled if less than two scenes.) | |
| License Info... | Opens a window to display your license status or free trial status. Allows you to register a license or remove a license from this computer. | |
|
User Guide | Does the same thing as clicking the Help Button on the toolbar. |
| Download Page | Opens the Keyframe Animation Download page in your browser. | |
| Purchase Page | Opens the Keyframe Animation Purchase page in your browser. |
Creating an Animation
There are seven easy steps to set up an animation and get your objects moving.
Step 1 - Group Geometry
Convert any geometry that you want to animate into groups or components. Loose geometry can not be animated.
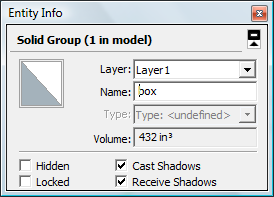
To check the type of something, select it, right-click, and choose Entity Info (context menu right-click > Entity Info)
It doesn't make any difference, for animation purposes, whether something is a group or a component. So, we will refer to them generically as objects.
Step 2 - Add Scenes
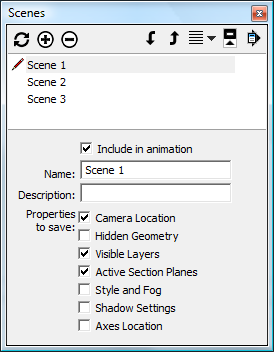
Add some scenes. You can use the Scenes Manager for this (menu item Window > Scenes).
Each scene is essentially a keyframe. You can add more scenes later, delete scenes, or change their order. To run an animation in reverse, just reverse the order of the scenes.
SketchUp will animate the properties saved with a scene. Keyframe Animation will animate the objects that are recorded on a scene.
Keyframe Animation 2.0 is compatible with all the scene properties:
- Camera Location
- Hidden Geometry
- Visible Layers
- Section Planes
- Style and Fog
- Shadow Settings
You can combine SketchUp's built-in animation of any scene property, with Keyframe's object animation, and export it all to a video.
Tip: Camera Location
If you are creating an animation where the camera does not move, leave the Camera Location box on each scene unchecked. This way, if you want to change the perspective you view the animation from, you can change it on-the-fly, for all the scenes at once, without having to update the Camera Location property on each scene.
Support for all cameras.
Now Keyframe Animation plays nice with all of the camera animations in SketchUp. This includes Perspective camera, Parallel Projection camera, and changes in the camera's Field Of View. You can combine any of these built-in animations, with Keyframe's object animation, and export it all to a video.
Step 3 - Select a Scene
Select the first scene by clicking on the scene tab. The tab becomes highlighted.
The scene with a highlighted tab is referred to as the current scene.
You can change which scene is the current one by clicking on different tabs, or by double-clicking on the scene name in the Scenes Manager.
Step 4 - Position Objects
Now use the Move Tool  ,
the Rotation Tool
,
the Rotation Tool  ,
or the Scale Tool
,
or the Scale Tool  ,
to position and/or resize the objects on the current scene.
,
to position and/or resize the objects on the current scene.
Step 5 - Record Objects
Click the Record Button on the toolbar to save the position data of objects on the current scene.
It doesn't make any difference whether the Play button is toggled on or off. A bell will ring, and the objects that were recorded will remain selected afterward, so you can see which ones they are. A plop sound indicates that no objects were recorded.
The record feature works slightly different in version 2.0. We think this logic is more intuitive and functional.
- If any objects are selected when you click the Record button, then only those objects will be recorded. This approach gives you the most control.
- If nothing is selected when you click Record, then all moving objects (i.e. objects that have position data saved for any scene) will be recorded. This approach saves time.
Re-recording an object updates its position data. To revise an animation, simply move the objects to new positions and re-record.
The Select Button.
There is a new Select Button on the toolbar.
It selects all objects that have position data saved on the current scene.
Then, with the objects selected, you can record them all in one click.
It is also a quick way to check if an object has position data saved on the current scene or not.
The Erase Button is kind of the opposite of Record.
It deletes the position data of all selected objects on every scene.
It is useful if you want to take a moving object out of the animation and make it stationary.
Warning: copying objects.
If you copy an object (e.g. Move + Ctrl),
that will copy the object's position data too.
So, you will probably want to click the Erase Button to delete it.
Otherwise, the copied object will move to the same location as the original object during the animation.
Warning: changing scene names.
The position data is tied to the scene names. So, if you change a scene's name, then the object's position data associated with it is lost. You will need to re-record the objects on that scene.
Step 6 - Repeat for each Scene
That is the basic workflow. Just repeat steps 3, 4, and 5 for each scene.
Step 7 - Play the Animation
The Play Button on the toolbar toggles Object Animation on or off.
When toggled on, objects will automatically move to their recorded positions during each scene transition.
When the Play button is toggled off, the objects won't move. Object animation is turned off by default when SketchUp first opens.
You can test out the animation by selecting one scene at a time to initiate each scene transition. Or run a slideshow of the whole animation (View > Animation > Play).
Tip: What to do if objects don't move.
If your objects are not moving, here are some steps to diagnose the cause.
- Check if the Play Button is toggled off. It is turned off by default when SketchUp opens.
- Toggling Play on only enables movement. The objects don't actually move until you select a scene, or run the slideshow animation.
- Make sure it is a group or component. Loose Geometry can not be recorded or animated. Use the Entity Info window to check the type (context menu right-click > Entity Info).
- An object will not move if there is no position data saved on the scene for it. Click the Select Button to see which objects have positon data saved on the current scene.
- If the object still doesn't move, maybe the position saved is the same as where it's at already. Try moving it somewhere else, and then select the scene tab. It should move back.
If an object is open for editing, the Object Animation will still proceed, but it is restricted to the moving objects that are contained in the active context.
Types of Interpolation
There are three types of interpolation depending on whether you Move ,
Rotate ,
or Scale
the objects.
Things can get more complicated if you combine the operations.
Note that Rotations are always interpolated through
the smallest angle between the object's orientation on one scene and the next.
So, the angle will always be less than or equal to 180 degrees.
If the angle is exactly 180 degrees, the direction is ambiguous, so the object could rotate either way.
A scale will interpolate the size of objects,
for any positive or negative scale factor, along any component axis (red, green, or blue).
A rotation
and a translation can not be combined, in general.
However, if the translation is parallel to the axis of rotation, then Keyframe Animation will interpolate it correctly.
For the other situations, it is possible to combine a translation with a rotation by
animating nested objects.
You can translate
and scale an object at the same time.
Keyframe Animation will always interpolate this correctly.
A scale
and a rotation can usually be combined.
If the point scaled about lies on the axis of rotation, then Keyframe Animation will interpolate it correctly.
If they are different, the interpolation will use a fixed point in between to both rotate and scale about.
If you want to scale about one point, while rotating about a different point,
you can do that by animating nested objects.
Reflections.
If you flip an object along its red, green, or blue axis (e.g. context menu right-click > Flip Along), that reflects it. Version 2.0 interpolates a Reflection by moving every point along a line that passes through a "mirror plane" in the middle to a point an equal distance on the other side -- reflecting the object in the process.
Inversions.
If you flip an object along all three axes, that inverts it. It amounts to a reflection through the center point. Version 2.0 interpolates an Inversion by moving every point along a line that passes through the center to a point an equal distance on the other side -- inverting the object in the process.
Tip: Reflections and Rotations.
If you flip an object along two axes, that is actually the same operation as rotating it 180 degrees, so it is interpolated as an ordinary rotation.
Animating Nested Objects
Keyframe Animation allows you to animate subgroups (or subcomponents) to any depth. Subgroups (subcomponents) move relative to their parent. They inherit their parent's motion, and then apply their own movement relative to it. This allows you to compose translations, rotations, and scaling operations, in order to create more complex types of motion.
To record a subgroup (subcomponent), select it first, then click the Record button. Usually, the easiest way to select a nested object is with Outliner. The other way is to open the objects that contain it by successively double-clicking on them, until you can select the nested object.
Time Settings
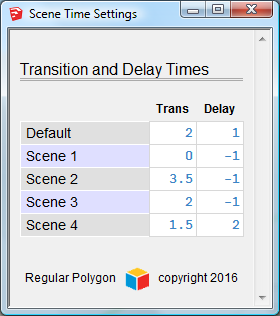
Click the Time Settings Button on the toolbar to display the Scene Time Settings window.
This interface allows you to set the transition time and delay time for each scene.
The time is rounded to half-second intervals.
The transition time is the number of seconds it takes for the animated objects to move to their recorded positions. It is also the time it takes for scene properties -- like camera location, or shadow settings -- to transition to the value saved with the scene. A negative value will use the default transition time.
The delay time is the number of seconds the animation will wait before beginning the transition to the next scene. A negative value will use the default delay time.
All settings are saved as soon as the textbox loses focus. A bell will ring to indicate the value has changed.
Exporting the Animation
Once your animation is set up, you can export it to a standard video, custom video, or an image sequence. SketchUp has a utility to export animations, but it only exports its own built-in animation of the scene properties, and ignores the object animation. However, Keyframe Animation 2.0 has a utility to export both the scene animation and the object animation, to a video or image sequence.
Video Export Utility.
Now you can combine SketchUp's built-in scene animation with Keyframe's object animation, and export it all, directly from the keyframe model. You no longer have to create the tweens model to export the object animation. This new approach is fast, simple, and far more efficient than creating the resource intensive tweens.
This also means that Keyframe Animation now plays nice with all the scene properties.
- Camera Location
- Hidden Geometry
- Visible Layers
- Section Planes
- Style and Fog
- Shadow Settings
Exporting a Standard Video (PC only)
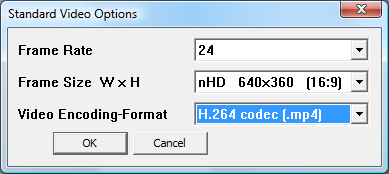
Click the Export Video Button on the toolbar to export the animation as a video with standard settings.
(Currently this only supported on the PC, not the Mac.)
The menu access is at Export Animation > Standard Video...
You can quickly choose from over a dozen common frame sizes having a 4:3 or 16:9 aspect ratio.
There are several video codecs and formats that are new in version 2.0.
- H.264 codec (
.mp4) - VP8 codec (
.webm) - VP9 codec (
.webm) - Theora codec (
.ogg) - Animated GIF (
.gif) - Windows Media Video (
.wmv) - Microsoft MPEG-4 v2 (
.avi) - Lossless (
.avi) - Uncompressed (
.avi)
Exporting a Custom Video (PC only)
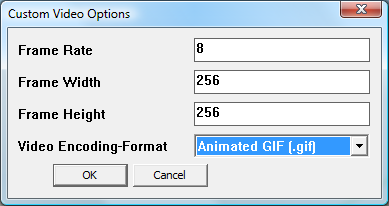
Access the menu item Export Animation > Custom Video... to export the animation as a video with custom settings. (Currently this only supported on the PC, not the Mac.)
The Frame Rate can go from 1 to 60 frames per second.
The Frame Size can go from 8x8 to 3840x2160 pixels.
The Video Encoding-Format options are the same as the Standard Video export.
Exporting an Image Sequence (PC and Mac)
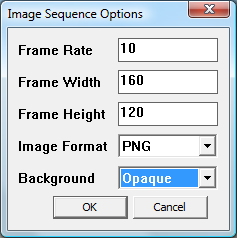
Access the menu item Export Animation > Image Sequence... to export the animation as a sequence of image files.
The Frame Rate can go from 1 to 60 frames per second.
The Frame Size can go from 8x8 to 3840x2160 pixels.
The Image Format has a drop-down list to choose from JPG, PNG, TIF, or BMP.
The Background is always opaque for .jpg, .tif, and .bmp image types.
However, if you are exporting .png type images, then the background can be either opaque or transparent.
The Export Process
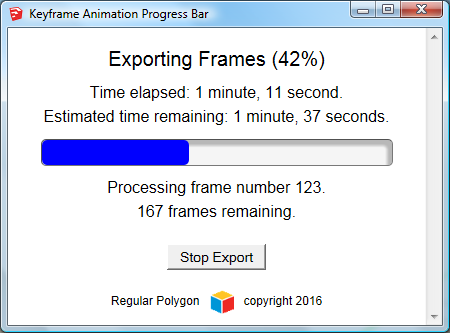
There is a new Progress Bar in version 2.0. It displays the time elapsed and the estimated time remaining, and generally makes the export process more user friendly.
The export process is also much more controlled. SketchUp no longer hangs forever while you watch the spinning ball, as was the case when generating the tweens. Click the Stop Export button to interrupt the frame processing at any time. You can resume it later, or stop and quit.
If you quit, the frames that have already been generated are saved in a folder. The next time you export the animation, with the same settings, you can reuse those frames.
You can even export half the frames one day, quit, close SketchUp, reopen it some other day, and pick up where you left off.
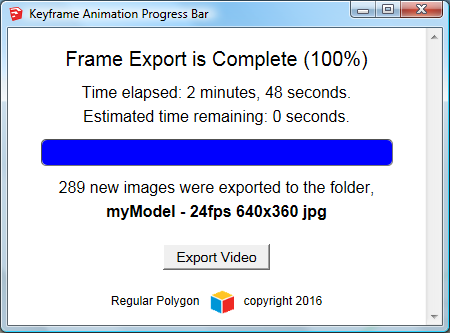
The frame folder is given a name based on the model name, the frame rate, the frame size, and the type of images exported. The folder is located in the same directory as the SketchUp model.
A typical frame folder name is, myModel - 24fps 640x360 jpg.
If you are exporting an image sequence, once the frame export is complete, that is the end of the process. Close the Progress Bar window.
If you are exporting a video, there will be an Export Video button. Click it to run a program that compresses the frames into a video with the encoding and format that were selected.
Tip: Exporting videos with different formats.
You only need to generate all the frames once for a particular frame size and frame rate.
After that, you can reuse the same frames to export videos with different formats and encodings.
For example, H.264 codec (.mp4), VP8 or VP9 (.webm), Animated GIF (.gif),
Lossless or Uncompressed (.avi), etc.
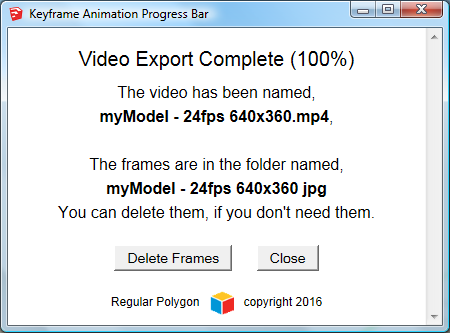
The video file is given a name based on the model name, the frame rate, and the frame size. It is located in the same folder as the SketchUp model.
A typical video file name is, myModel - 24fps 640x360.mp4.
Once the video is created, the Progress Bar window displays the name of the video file and the frames folder.
If you don't need the frames for anything else, you can delete them and the folder by clicking the Delete Frames button.
And that's it; the animation is exported. Much more simple than the old way of generating all those tweens. The animations can probably be much longer with this new approach too.
Caveat (Mac only)
Exporting the animation to a video is not yet supported on the Mac. Currently, the only way to export the animation on the Mac is as an image sequence. A video can be created from the image sequence using third-party software. Another possibility is, you could use Quicktime to capture a screencast of the animation. We hope to add video export support to the Mac soon -- like this year, 2017.
Backward Compatibility with Version 1.9
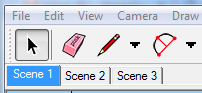
If you see a grayed out toolbar, like this...

it is NOT a bug.
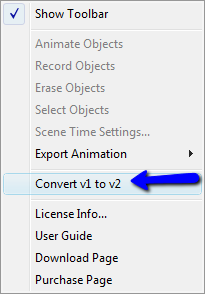
A grayed out toolbar means your model has position data recorded in version 1.9 format. What is going on under the hood in version 2.0 is so different that your version 1.x animation will not run. Basically, if you open a model with version 1.x position data, all of the commands on the toolbar and menu will be disabled.
However, there is a quick and easy solution.
There is a utility that will convert a 1.x animation to version 2.x format.
Access is from the menu item, Keyframe Animation > Convert v1 to v2.
The Keyframe 2.x compatible animation is created in a new model. You can save it with any name you want. The original model is NOT modified.
Once the new model is open, your old animation will work in Keyframe Animation 2.x, and all the toolbar buttons and menu items will be enabled normally.
This feature does require SketchUp 2014 or newer.